Create Interactive Charts using PHP and MySQL Database
There are two ways of obtaining data for the chart:
- Statically - by defining the data during the creation of the chart
- Dynamically - by retrieving data from another source
Static binding of data is not much useful and it does not accommodate updates to the underlying data whereas in case of dynamic binding, the data shown by the chart is always fresh.
But how do we go about dynamic binding of data? Before we explain that, let us understand how dynamic binding of data works. The data required is stored in an external source which can be a database and is provided to the chart via a server side program as shown in the below diagram:

In this article we are going to show you how to write server side code in PHP to retrieve the data from MySQL database and bind the data obtained to the chart. We are going to divide this article in two four parts:
- Installing prerequisite software
- Creating database and initializing with seed data in MySQL
- Implementing PHP based server program
- Integrating chart with the data from server
To demonstrate this let us consider data of top 10 wicket takers in One Day International (ODI) cricket in the year 2015.
Step-1: Installing Prerequisite Software
Note: You can skip this step if you have LAMP or WAMP already installed.
To get the code in this article working we would need to install the following:
- MySQL
- Apache web server
- PHP
This stack is popularly called as *AMP(Apache MySQL PHP) stack, and when you include the platform on which this stack is running, then it becomes either WAMP (Windows Apache MySQL PHP) or LAMP (Linux Apache MySQL PHP). So there are lots of vendors who bundle this stack and make it available for download. For this article, we are going to make use of the WAMP bundle provided by Bitnami.
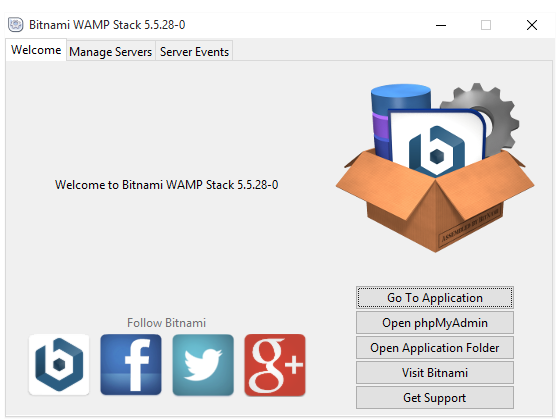
At the end of the installation of the WAMP bundle you will be prompted to launch the app as shown below:

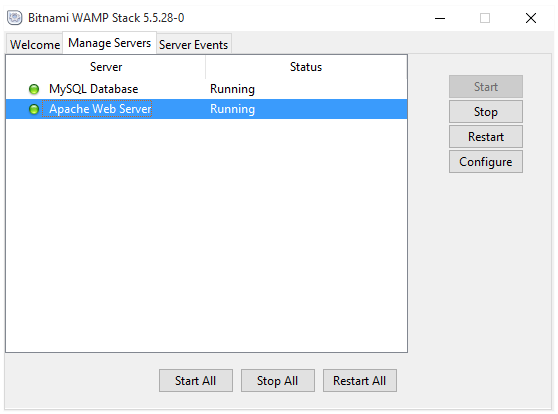
You can manage the MySQL DB server and Apache server by clicking on the Manage Servers tab as shown below:

Step-2: Creating Database and Initializing with seed data in MySQL
WAMP bundle installed above provides a browser based application to interact with the MySQL DB. The browser based application can be accessed at: http://127.0.0.1/phpmyadmin/. You will be prompted for username and password as shown below:

The username is 'root' and password is the one you configured during the installation of the WAMP stack.
Now let us come to the setting up of table and seed data. The table containing the data is made up of two columns namely the name of the player and number of wickets. The CREATE TABLE SQL command for creating the table is given below:
USE test;
CREATE TABLE top_odi_wicket_takers(
player varchar(255),
wickets integer,
PRIMARY KEY (player)
);Now let us seed this table with some initial data taken from here as shown below:
INSERT INTO top_odi_wicket_takers(player, wickets) VALUES('MA Starc', 34);
INSERT INTO top_odi_wicket_takers(player, wickets) VALUES('ST Finn', 27);
INSERT INTO top_odi_wicket_takers(player, wickets) VALUES('Imran Tahir', 25);
INSERT INTO top_odi_wicket_takers(player, wickets) VALUES('M Morkel', 21);
INSERT INTO top_odi_wicket_takers(player, wickets) VALUES('TA Boult', 36);
INSERT INTO top_odi_wicket_takers(player, wickets) VALUES('TG Southee', 28);
INSERT INTO top_odi_wicket_takers(player, wickets) VALUES('CJ Anderson', 25);
INSERT INTO top_odi_wicket_takers(player, wickets) VALUES('Wahab Riaz', 25);
INSERT INTO top_odi_wicket_takers(player, wickets) VALUES('JH Davey', 21);
INSERT INTO top_odi_wicket_takers(player, wickets) VALUES('UT Yadav', 22);We can verify whether the data is inserted by running the SELECT SQL command as shown below:
SELECT * FROM top_odi_wicket_takers;
+-------------+---------+
| player | wickets |
+-------------+---------+
| CJ Anderson | 25 |
| Imran Tahir | 25 |
| JH Davey | 21 |
| M Morkel | 21 |
| MA Starc | 34 |
| ST Finn | 27 |
| TA Boult | 36 |
| TG Southee | 28 |
| UT Yadav | 22 |
| Wahab Riaz | 25 |
+-------------+---------+
10 rows in set (0.00 sec)With this we have the required data in the database. Let us now proceed to see how to implement the server program in PHP.
Step-3: Implementing PHP based Server Program
PHP is one of the most widely used server side programming languages. (other such languages are Java, C#, Ruby, Node.js).
Let us first list out the steps involved in the program before we proceed with its implementation.
- Establish the connection with MySQL Database using the hostname, username, password and database name.
- Execute the query to get the list of players from DB and store them in a variable.
- Iterate over the result set to build an array of maps where each map consists of two keys namely: label and value. The label stores the name of the player and value contains the number of wickets
- Encode the array of maps into JSON and then output the encoded JSON. (If JSON is something new for you, then we would recommend you to read about it here.)
The implementation of above steps is as follows:
- The default username to connect to MySQL instance running on your machine is root and password is the one you specified during the installation of your WAMP bundle. The interaction with the database from PHP is achieved using the mysqli extension. Below is the default implementation to establish the connection:
You can set custom
usernameandpasswordto connect to the database.
<?php
//address of the server where db is installed
$servername = "localhost";
//username to connect to the db
//the default value is root
$username = "root";
//password to connect to the db
//this is the value you specified during installation of WAMP stack
$password = "password";
//name of the db under which the table is created
$dbName = "test";
//establishing the connection to the db.
$conn = new mysqli($servername, $username, $password, $dbName);
//checking if there were any error during the last connection attempt
if ($conn->connect_error) {
die("Connection failed: " . $conn->connect_error);
}
?>- Once we have the connection established, we use connection object \$conn to execute any SQL commands. We can now execute our SQL query as shown below:
<?php
//the SQL query to be executed
$query = "SELECT * FROM top_odi_wicket_takers";
//storing the result of the executed query
$result = $conn->query($query);
?>- We have to now process the $result obtained in the above step in the form which is understood by FusionCharts. FusionCharts uses the chart data in the form of a list of label-value pairs. If there are rows/data returned by the query, we convert that data into an associative array. An associative array is just like any other array but in place of indices it uses keys to store the value of the array element. Below is the implementation to process the data in $result object:
<?php
//initialize the array to store the processed data
$jsonArray = array();
//check if there is any data returned by the SQL Query
if ($result->num_rows > 0) {
//Converting the results into an associative array
while($row = $result->fetch_assoc()) {
$jsonArrayItem = array();
$jsonArrayItem['label'] = $row['player'];
$jsonArrayItem['value'] = $row['wickets'];
//append the above created object into the main array.
array_push($jsonArray, $jsonArrayItem);
}
}
?>- Let us now encode the data processed in above step into JSON data as shown below:
<?php
//Closing the connection to DB
$conn->close();
//set the response content type as JSON
header('Content-type: application/json');
//output the return value of json encode using the echo function.
echo json_encode($jsonArray);
?>Let us integrate the code we have from all the steps above into a file named: chart_data.php and place this file at BITNAMI_INSTALL_DIR\apache2\htdocs, where BITNAMI_INSTALL_DIR is the path where your Bitnami WAMP package is installed.
Note: There are other approaches as well to deploy the PHP application we have created as described here.
The contents of the chart_data.php is as shown below:
<?php
//address of the server where db is installed
$servername = "localhost";
//username to connect to the db
//the default value is root
$username = "root";
//password to connect to the db
//this is the value you would have specified during installation of WAMP stack
$password = "password";
//name of the db under which the table is created
$dbName = "test";
//establishing the connection to the db.
$conn = new mysqli($servername, $username, $password, $dbName);
//checking if there were any error during the last connection attempt
if ($conn->connect_error) {
die("Connection failed: " . $conn->connect_error);
}
//the SQL query to be executed
$query = "SELECT * FROM top_odi_wicket_takers";
//storing the result of the executed query
$result = $conn->query($query);
//initialize the array to store the processed data
$jsonArray = array();
//check if there is any data returned by the SQL Query
if ($result->num_rows > 0) {
//Converting the results into an associative array
while($row = $result->fetch_assoc()) {
$jsonArrayItem = array();
$jsonArrayItem['label'] = $row['player'];
$jsonArrayItem['value'] = $row['wickets'];
//append the above created object into the main array.
array_push($jsonArray, $jsonArrayItem);
}
}
//Closing the connection to DB
$conn->close();
//set the response content type as JSON
header('Content-type: application/json');
//output the return value of json encode using the echo function.
echo json_encode($jsonArray);
?>var apiChart = new FusionCharts({
type: "column2d",
renderAt: "api-chart-container",
width: "550",
height: "350",
dataFormat: "json",
dataSource: {
chart: chartProperties,
data: chartData
}
});
$(function() {
$("#background-btn").click(function() {
modifyBackground();
});
$("#canvas-btn").click(function() {
modifyCanvas();
});
$("#dataplot-btn").click(function() {
modifyDataplot();
});
apiChart.render();
});
function modifyBackground() {
//to be implemented
}
function modifyCanvas() {
//to be implemented
}
function modifyDataplot() {
//to be implemented
}To run chart_data.php, open http://localhost/chart_data.php in your browser. You would see the below JSON output:
[
{
label: "CJ Anderson",
value: "25"
},
{
label: "Imran Tahir",
value: "25"
},
...
...
]So with this we have our data source for the chart ready. Let us now go ahead and integrate it with FusionCharts library.
Step-4: Integrating chart with the data from Server
First let us download the required JavaScript libraries:
- Download FusionCharts from here (if you don’t have it already) and copy the required JavaScript files under js folder in BITNAMI_INSTALL_DIR\apache2\htdocs.
- Download jQuery 2.x from here and copy it under the above created js folder.
Now let us create the HTML page chart_sample.html required to render the chart:
<!DOCTYPE html>
<html>
<head>
<title>FusionCharts Column 2D Sample</title>
</head>
<body>
<div id="chart-container">FusionCharts will render here</div>
<script src="js/jquery-2.1.4.js"></script>
<script src="js/fusioncharts.js"></script>
<script src="js/fusioncharts.charts.js"></script>
<script src="js/themes/fusioncharts.theme.zune.js"></script>
<script src="js/app.js"></script>
</body>
</html>The code which interacts with the PHP server implemented above. This code renders the chart using a Javascript library implemented in the app.js file. Place the app.js file in the js folder. The javascript implementation is shown below:
- Fetch the required data from the server via an Ajax call using jQuery:
$.ajax({
url: "http://localhost/chart_data.php",
type: "GET",
success: function(data) {
chartData = data;
}
});- After retrieving the data from the server, initialise the FusionCharts object with the chart properties and chart data as shown below:
var chartProperties = {
"caption": "Top 10 wicket takes ODI Cricket in 2015",
"xAxisName": "Player",
"yAxisName": "Wickets Taken",
"rotatevalues": "1",
"theme": "zune"
};
apiChart = new FusionCharts({
type: 'column2d',
renderAt: 'chart-container',
width: '550',
height: '350',
dataFormat: 'json',
dataSource: {
"chart": chartProperties,
"data": chartData
}
});
apiChart.render();
}Final app.js will look as below:
$(function() {
$.ajax({
url: "http://localhost/chart_data.php",
type: "GET",
success: function(data) {
chartData = data;
var chartProperties = {
caption: "Top 10 wicket takes ODI Cricket in 2015",
xAxisName: "Player",
yAxisName: "Wickets Taken",
rotatevalues: "1",
theme: "zune"
};
apiChart = new FusionCharts({
type: "column2d",
renderAt: "chart-container",
width: "550",
height: "350",
dataFormat: "json",
dataSource: {
chart: chartProperties,
data: chartData
}
});
apiChart.render();
}
});
});Now load the HTML in the browser using the URL: http://localhost/chart_sample.html and you will get the below chart:
Please unzip it in the BITNAMI_INSTALL_DIR\apache2\htdocs folder to get the sample running.